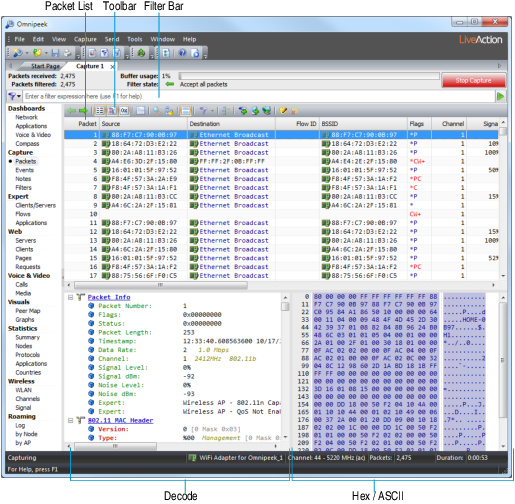
Navigating the Packets view
The Packets view can display any combination of the Packet List, Decode, Hex, and ASCII panes. The toolbar lets you show or hide the panes. The filter bar lets you create a wide variety of advanced filters quickly and directly from the capture window. See Creating filters using the filter bar.
The buttons in the Packets view toolbar are described here:
• Decode Previous: Decodes the previous packet.
• Decode Next: Decodes the next packet.
• Show Packet List: Shows or hides the Packet List view.
• Show Decode View: Shows or hides the Decode view.
• Show Hex View: Shows or hides the Hex view.
• Toggle Orientation: Changes the orientation of how the Decode and Hex views are displayed.
• Zoom Pane: Shows only the view of what is currently selected.
• Toggle Mark Packets: Toggles the highlighting of packets from the same flow as the selected packet. You can enable/disable this feature from the Packet List Options dialog.
• Auto Scroll: Enables or disables the scrolling of packets when packets are being captured. Alternatively, you can press to enable or disable scrolling.
• Display Filter: Displays in the packet list only the packets that pass (match) the selected filter. Choosing All shows all packets. This functionality is available with capture windows; however, it cannot be used while capturing (you must stop the capture first). See Display filters.
TIP: Hold down the key to show only those packets which do NOT match the selected filter for the entire buffer. Hold down the key to apply the filter for only those packets which are currently visible. Hold down both and together to hide any currently visible packets which do not match the selected filter.
• Flow Visualizer: Opens the Flow Visualizer, which presents a variety of ways to look at an individual flow, providing a snapshot all of the packets that were in the buffer for a particular flow at the time the window was created. See Flow Visualizer.
• Make Filter: Opens the Insert Filter dialog to create a filter based on the selected packet.
• Insert Into Name Table: Opens a dialog to add the selected packet into the Name Table. From the dialog, you can also select Node type icons that will appear to the left of the selected packet. For example, Workstation, Server, Router, or Access Point.
• Resolve Names: Checks the DNS server for a name to match the supplied address.
• Edit Note: Opens the Edit Note dialog to add a note to the selected packet.
• Delete Note: Deletes any note entered for the selected packet.
The Packets view panes are described here:
• Packet List: This pane displays information about each packet in a table with user-configurable columns. Right-click a column head to show or hide other available columns. You can also drag column heads to other positions within the table. See Packet list columns. You can also right-click a packet for additional options, including Select Related Packets and Select Related Flow. See Selecting related packets or Selecting related flows.
IMPORTANT: By selecting, hiding, and unhiding packets in the Packet List, you can force a recalculation of statistics in other views of the window, based only on the packets that remain visible. See also Copying selected packets to a new window.
• Decode: This pane displays detailed information about the selected packet. Click a detail and the corresponding hexadecimal values and ASCII characters are automatically highlighted in the Hex pane. See Decoding packets for more information.
TIP: You can double-click a packet to display its Decode window.
• Hex: This pane displays the selected packet as raw hexadecimal values and ASCII characters. Click a hexadecimal value or an ASCII character and the corresponding details are automatically highlighted in the Decode pane.